Method - How to repair Joist Ends with Joist End Repair Plates
- Support the joists to the ground using props or jacks
- Cut off the damaged length (up to a maximum of 17" - 432mm - to include the piece in the wall)
- Fix one of the pair of shouldered, galvanised plates with a few nails into the parent timber, through the nail holes provided, with the plate resting on the bearing support wall
- Choose holes for the coach screws that avoid splits and knots, and then pilot drill the holes with a 6mm wood drill. Avoid placing the coach screws in straight line, because this might split the wood along the grain. Insert the coach screws and tighten lightly.
- Choose holes for the bolts that avoid splits and knots and then drill through the wood with a 10mm diameter wood bit.
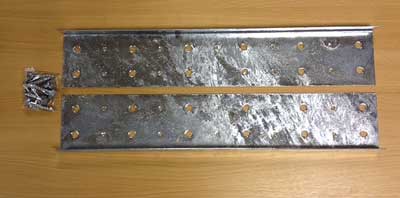
- Push the two bolts through the plate and the wood - don't forget to fit the washers
- Take the second plate and push it onto the protruding bolts. Fit the washers and tighten the bolts firmly.
- Check that the plates are both seated tightly under and against the joist. If not, remove the plates and start again.
- Choose holes for the coach screws that avoid splits and knots, and then pilot drill the holes with a 6mm wood drill. Avoid placing the coach screws in straight line, or dead opposite ones on the other plate, because this might split the wood along the grain. Insert the coach screws and tighten lightly.
- Tighten all the coach screws and nuts firmly.
- Treat the exposed cut end of the parent joist using our Boron Gel, to prevent future decay.
- Cut a piece of matching timber as an infill piece, treat with Boron Gel and drop in to the space to fill in the gap to the wall (optional - not supplied - often not required in short repairs
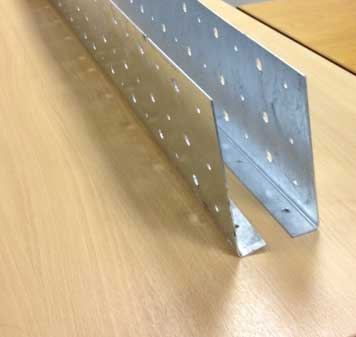
Joist end repair plates - can also be used for reinforcement of weakened joists.
BRE Notching and Drillinf Holes in Joists
Care of H S Hire, Broadmeadow Industrial Estate,
Teignmouth, TQ14 9AE
T: 01626 872886
E: help@propertyrepairsystems.co.uk
Home | Repairs | Bower Beams | Privacy Policy | Returns Policy | Contact
Use any of our Shopping Pages to place goods in your Shopping Cart - they all use the same Shopping Cart system.

Click to view your Shopping Cart
or continue shopping by clicking on one of our Shops below.
OUR CLOSELY RELATED SHOPPING PAGES
OUR OTHER SHOPPING PAGES
Other Property Repair Systems Sites:
www.drywallandfloor.co.uk - membranes for lining damp walls, floors, basements and cellars
www.epoxy-info.co.uk - epoxy resins for repairing wood, concrete, brick and stone
www.fire-door-paint.co.uk - upgrade doors to 30 minutes fire resistance
www.propertyrepairsystems.co.uk - our Home Site
www.steel-fire-paint.co.uk - treat steel with Intumescent Paint to provide fire protection
www.timber.org.uk - systems of repair, with step by step methods
www.timber-repair.co.uk - how to repair timber beams
Site written by: David Moore
David Moore, B.A. (Hons.), C.T.I.S., C.R.D.S. Technical Author
Google+